Preparing Images
Before you upload images to your site they need to be sized, color-corrected and exported as jpegs. Color correct you image for the screen. In order to fit on most screens using “lightbox” images should have a maximum width of 900px and a maximum height of 600px. Images should be 72dpi and exported as a medium high quality jpeg. Don’t export them at 99% quality. The final image will be between 50KB and 100KB. WordPress will create thumbnails for you.
Both Photoshop and Fireworks offer batch processing, which can automate some of this tedious work.
There are two free online image-editing services that I would recommend if you do not own a good image-editing program. Both of them are easy to use and can do everything you need to creating screen-ready images – resizing, minor color correction and sharpening and exporting as a jpeg.
http://www.pixlr.com/
Go to the site and then click “Image Editor”.http://www.aviary.com/
Click “Image Editor” icon, then click “Launch Phoenix, start a new creation”. It should be fairly self-explanatory after that.
I recommend that you organize your image files in folders as you want them to appear online so it will be easy to access them as you upload them.
NOTE: You will have better luck if your file names, include the proper extension, jpg, etc and have no white space or unusual characters, e.g. $#^,”” . It is best if the names include only letters, numbers, underscore and dashes.
Adding Images to a Post and Creating a “Gallery”
Steve Lambert’s “WPFolio User’s Manual” also includes instructions on creating galleries.
Click on “Posts” in the left hand menu of WordPress.
Click “New Post”
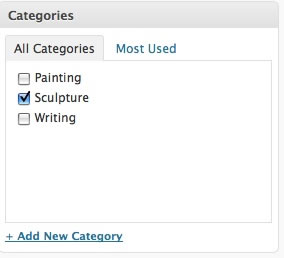
Make sure you choose the category for the post, in the right hand sidebar.
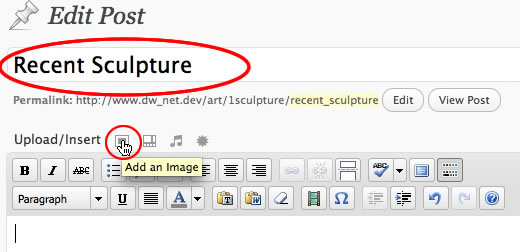
Add a title for the the group of images being uploaded, e.g. “Recent Sculpture”,
“River Series”, etc.
Click the small image icon above the “post” text box, shown below:
An overlay dialog box appears. Click Select Files
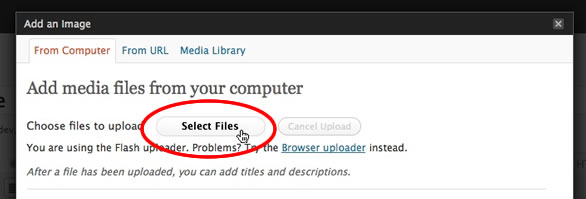
Navigate to the images you wish to upload and select them.
You can select multiple files.
Watch the images as they upload. It will be quick if you have broadband.
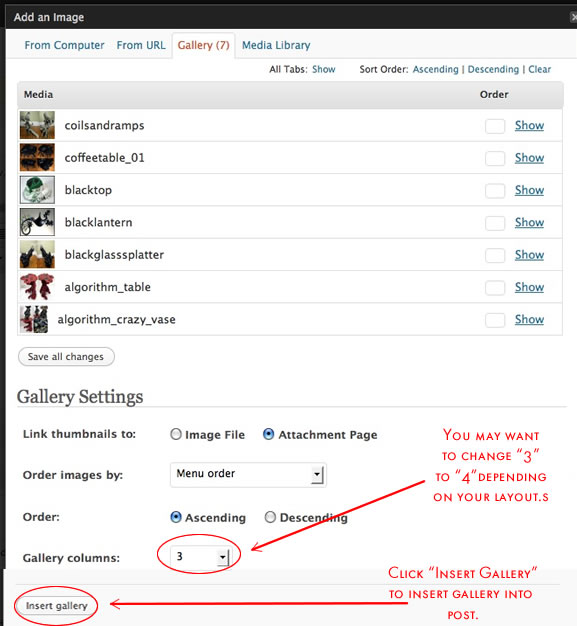
Click “Save All Changes” and the screen will refresh in the Gallery tab.
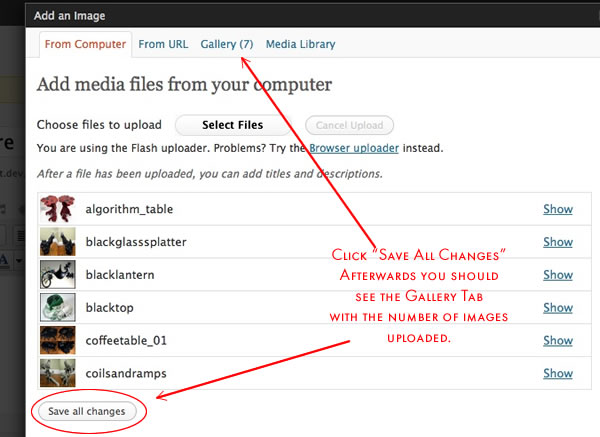
NOTE: I have noticed a glitch. If you are uploading large files or many files at the same time, the gallery tab does not appear. Try uploading one image first. Then repeat the process selecting multiple files from your computer. This method seems to force the software to create a gallery.
Leave the other gallery options, as is.
You may want to change the number of Gallery Columns depending on the layout of your page.
You will return to this screen later to add more information like title, media, size to your images.
Click “Insert Gallery”.
After returning to the post page Click “Publish” on the right side of the page.
Click “View Post” to check the page.
You should see a page with several rows of thumbnails cropped to 150 x 150 pixels.
Click the thumbnails and see the lightbox in action.
Adding the title, media, date and size of each artwork
In the admin section of WordPress return to the post you just created.
There are 2 ways to access your uploaded images.
1) In the text box, click the gallery icon and then click the image icon to edit the gallery (see below).
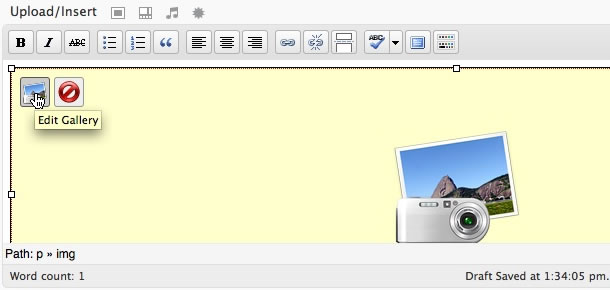
OR
2) Click the image icon adjacent to “Upload/Insert (see below)

In the overlay dialog box click “show” next to an image.
![]()
Add title, media, size and date to “Title”. (As you get to know WordPress, you may want to use the other options. For now, leave them as is.)
Repeat this process with all your images.
Don’t forget to do this or your titles will be lost and you will have to enter them again.

Once you have finished click “Save All Changes”, at the bottom of the list of images.
Because this is a “Gallery”, do not click “Insert into Post”

Exit the dialog box

and click “Update”.

Check your page by clicking “View Post”. The title, etc. only appears in the “lightbox”, not below the thumbnails.
Repeat to create more “galleries”.
Useful Links
Adding Posts – WPFolio User’s Manual
Choosing the featured image
There is now a new, easier, better way to choose the featured thumbnail on a category page.
On the Posts page of the WordPress Dashboard click “Set Featured Image” in the “Featured Image” subpanel in the lower right sidebar.

Then on the “Add an Image” screen, click “Use as Featured Image”.
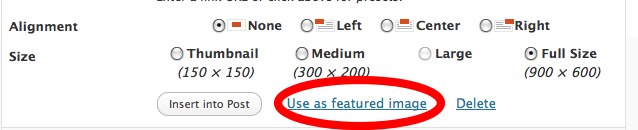
Be sure to click ” Save All Changes” before closing dialog box.
The featured image will appear in the lower right of the Edit Posts page. Like this:
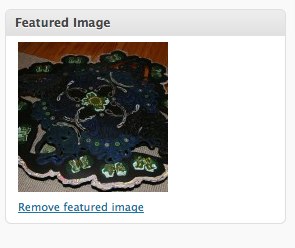
You can easily remove the image and add another one, if you wish.
Hi Daniel. I really appreciate your tutorials. I have a simple question..I think. I just started using wordpress and wpfolio and I would like to set my site up with my blog as my homepage and then just a few other categories like portolio, photography and about. The issue I’m having is that I keep creating posts with gallery images and it keeps posting these things on my homepage blog. I don’t want them displayed there. I only want my ‘blog’ posts to come in as posts. I want everything else to be static underneath my other categories. Is there a way to do this? Thank you
Josh,
Thanks. I am glad the tutorial is helpful.
This requires a plugin called FrontPage Manager (It should be easy but to do it without a plugin, but it requires some programming and the creation of a new file for the WPFolio theme. So, let’s skip ahead and use the plugin).
With recent versions of WordPress you can find and install plugins from the “Dashboard”. Go to Plugins->Add New and enter “Frontpage Manager” in the search box. In the list of plugins then shown, “Frontpage Manager” is about 5th in the list. Click “install” to the right of the plugin description and follow the screen instructions until the plugin is installed and activated. (Don’t forget to activate it).
Then go to Settings->Frontpage Manager, choose the category and options you wish and click “Update Options”.
Make sure that in Setting->Reading that you have chosen “Your Latest Posts” for “Front Page Displays”.
Check your front page. As with all things “computer” it may take a few tries to get exactly what you want.
Useful Links
Frontpage Manager on WordPress
Plugin Homepage
Hi Daniel,
Thank you for all of the detailed instructions. unfortunately, I have run into a couple of glitches that I am hoping you can help me out with:
1. I want to change the picture on my homepage to a photoshopped collage jpeg I uploaded into my gallery to show multiple works. I tried replacing the other photo, but then nothing showed up at all, so I restored it to your settings. How can I make my new image work?
2. In my painting category, I have three pages and I want to change the order of them as well as the thumbnail images on the links. I tried to reorder them by looking for the number order box that I remember seeing before, but I couldn’t find it. Maybe I’m looking in the wrong place? And as for the thumbnails, I have no idea how to alter those.
Thank you!
Hi Daniel,
-I also would like to know how to change the order of my posts of galleries.
-And, I wanted to know how I can choose which image represents each gallery post.
Thank you! I love this theme, I have been searching for this style for a long time.
Sorry I have a back to back posts.
I just realized that the titles of my paintings are jumbled when in the gallery slide show. My titles tend to be long and some do not fit within the width of the image. I also would like to have other information (date, medium, dimensions) listed below the title in the gallery slide show. I am using jQuery Lightbox. I really like the way
http://matthewdeleget.com/2009/05/war-monochromes-2007-present/
has his slide show formatted, but can’t seem to figure it out myself.
thank you once again 🙂
-sofia
I found a fix for the missing gallery tab bug here: http://wordpress.tv/2009/01/05/creating-an-image-gallery/
Apparently you just save your draft post before inserting images. Silly, but it works for me!
The easiest way to do this is to use 2 plugins Gallery Plus and Lightbox 2 (Not Jquery Lightbox). I think the configuration of the plugins will be pretty obvious, if not write and I will answer your question.
To order the images in your gallery, click on the image icon on the edit page for a post. Click on the gallery tab. You will see a list of images and titles. There is a small gray box just to the left of the “show” link. If you enter the numbers in those boxes the images will appear on your site in that order. It is slightly clumsy to implement but it works.
To choose a an image to represent the gallery on the category page you need the most recent version of WPFolio. You can update it on the Themes page. And you need WordPress 2.9 or later. After you have updated your theme and WordPress return to the gallery dialog box on the Edit Post page click “show” next to the image you want and click “Use as Featured Image” towards the bottom of the image dialog (below title, alt, caption, etc. text boxes). Click Save Changes in the image dialog box. Click Update for the Post. And that should do it.
Write if there are problems.
Hello,
I have followed all of your instructions for setting up a gallery, yet when I get to the part where I need to edit the size of the image (i.e. Thumbnail, medium, large) I am unable to set the images to thumbnail, or anything other than full size, for that matter. Is this something you can help me with?
Kate,
Sorry for the delay in answering.
I looked at your site and you have uploaded tiffs. You need to convert/export your images as jpegs. WordPress (and any website) only works with jpeg, gif and png image formats.
1) So you should delete all the images you have uploaded. Delete them from your posts. Then delete them from your Media Library. In WordPress go to Media. Click the check box next to all the images and then delete them.
2) Export your images as jpegs with a maximum width of 900 pixels or height of 600 pixels.
3) Read the instructions carefully. And check out http://wpfolio.visitsteve.com/wiki/
Make sure you have configured the Media settings in WordPress correctly. And that you have installed a Lightbox or Shadowbox or equivalent plugin.
4) And then re-upload them to the appropriate posts. This should work better. WordPress and WPFolio will create and display thumbnails for you.
Good luck. Write you if need help creating jpegs.
Hi Daniel,
Your instructions for setting up wpfolio have been amazing! Thank you. I absolutely couldn’t have gotten this far without your step by step instructions.
But I’m at a standstill right now and would love your help. I want a nice slideshow for each collection of images I post. I’ve uploaded jquery for lightbox. I see how nice it looks in other pages. Also I am using the wpfolio test version. Anyway, no matter what I do, I can’t seem to make it work so that when you click on an image thumbnail you get a slideshow. I assume there’s some really simple thing I’m missing. Can you help?
Thanks!
Becca,
Thanks for the feedback. I am glad to be of help.
I took a look at your site. It can be hard to diagnose these kinds of problems without being able to look at the WordPress Dashboard but I notice 2 things. First you are using a plugin called something like Custom Contact. Sometimes plugins will conflict with each other. I think you should try deactivating the Custom Contact. Go to Plugins in the left hand sidebar of the WordPress admin, hover the cursor over Custom Contact and then click “deactivate”. That may work. Also you don’t need it since you are not using it on your contact page. Then try your gallery again to see if the slideshow works. If not, try de-activating other plugins.
The other thing I noticed is that your images are way way way too large. For WPFolio images should be 72dpi with a maximum width of 900px and a maximum height of 600px. For instance Coffee Scene in Illustrations is 2000+ pixels wide. Not only will it not fit on the screen it takes a long time for users to see it because of the download time. I recommend sizing your images with an image editing program before you upload them to wordpress. Photoshop Elements is a fairly inexpensive product for image editing. http://www.pixelmator.com/ and http://flyingmeat.com/acorn/ are also inexpensive. And http://www.pixlr.com/ and http://www.aviary.com/ are online image editors that you can use for free and will do everything you need. I would recommend that you delete all the too-large images on your site and then re-upload the newly sized images. That may not solve the slide show problem but will help the overall functionality of your site.