In this tutorial I explain how to install WordPress on GoDaddy. The goal is to create an online artist’s portfolio using WPFolio created by Eyebeam.
Installing WordPress
Go to http://www.godaddy.com
Sign in with your Go Daddy account username and password.
Click on “Hosting” in the left menu. (below the heading “My Products”).
On the next screen, click on your domain name. This will take you to the main page of your hosting account.
On your hosting account page click on the “Your Applications” button, towards the top of the screen.

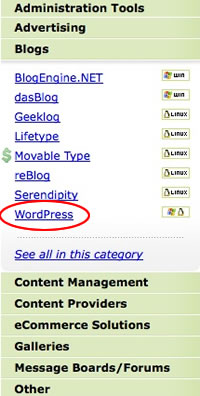
On the Your Applications page, click “Blogs” in the left hand menu and once it “Blogs” opens click “WordPress”.
On the WordPress page, click “Install Now”.

Follow the instructions on the 4 installations screens.
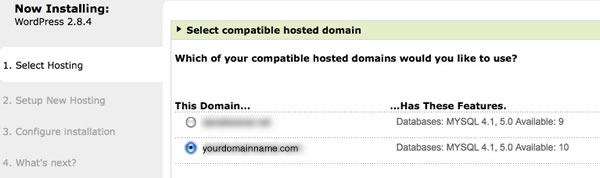
Select Hosting: Select the host for the correct domain name. You will probably only have one choice. Click Continue.
2. Setup New Hosting – use defaults
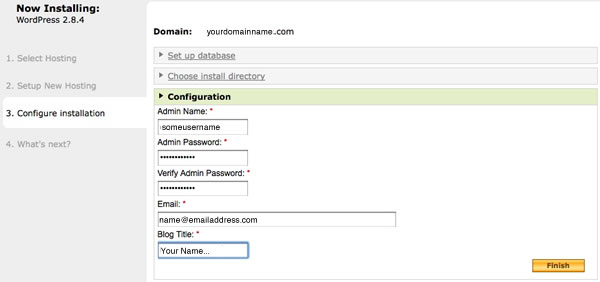
3. Configure installation: Follow the 3 steps – Set up Database, Choose Installation Directory, Configuration.
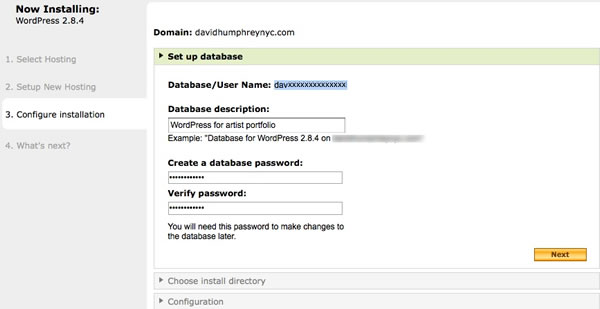
3a. Set up Database: GoDaddy will choose a username for your database and you will add a description and password for the database. You will rarely have to use this username/password combo, but because you are conscientious you will keep them somewhere safe. (If you followed my tutorial for signing up with GoDaddy this will be your third username/password pair). Click “Next”.
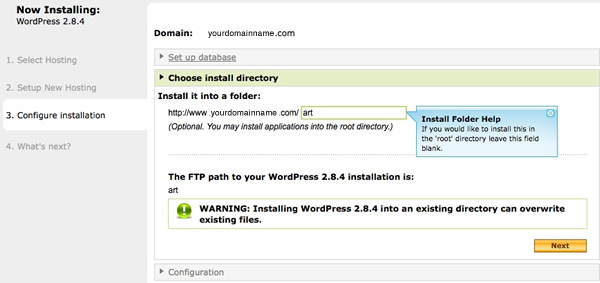
3b) Choose install directory: I like to install WordPress in a folder, rather than the root directory. If WordPress is installed in a folder you will have more freedom creating a home page and can easily install other pages or applications in the root or other folders. It is also a good idea to give this folder a name appropriate to the content of your website. In this instance I use “art”. Go Daddy creates this folder for you. (If you want to install WordPress in the root folder, leave this field blank.) Click “Next”.
NOTE: Installing WordPress in its own folder, as recommended above, can cause a problem. If a user goes to http://www.yoursitename.com they will see a generic “Site Coming Soon” screen while the content of your site is located at http://www.yoursitename.com/folder-name/. There are 2 ways to solve this that are explained in the comment section below.
3c) Configuration: Configure WordPress. Create yet another username and password pair. (Your 4th if you have been following both tutorials). This username and password will be used to log into WordPress. You will use them frequently. Save them and keep them in a safe place. Fill in an email address. The WordPress application application frequently emails you information about your account – comments, lost passwords, etc. And give your site a title. In most instances that will be your name, but you can also add other information. e.g. John Doe- Paintings and Sculpture. The title will appear at the top of each page. You can change it later, if you wish. Click “Finish”.
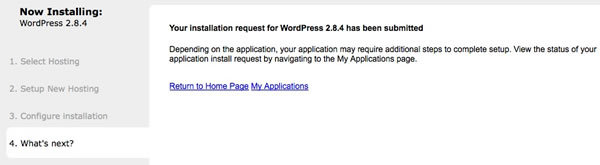
4) You are done. But you have to wait for GoDaddy to install WordPress. It will take from one hour or more. Check “My Applications” to see if the installation is complete.
Check WordPress:
Once GoDaddy has installed WordPress for you, you can check the front page. If you created an install directory be sure to include that in your url. It should look something like
http://www.yourdomainname.com/wordpress_folder/ And you should see something like this:

Don’t worry, once you have installed WPFolio and images of your work, it will look much different.
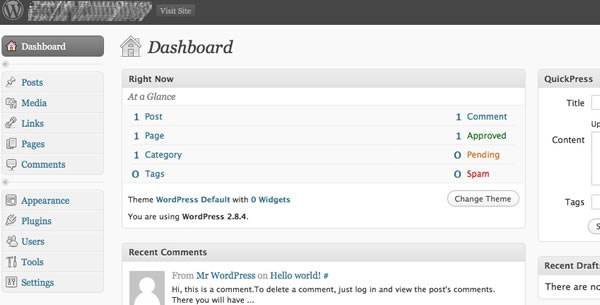
And you can check the admin section of WordPress as well. Go to:
http://www.yourdomainname.com/wordpress_folder/wp-admin/ Or to make it more explicit: for my test site I used the folder “art” to install WordPress. So the admin section will be:
http://www.danielwiener.net/art/wp-admin/
Enter your WordPress username and password and you should see a screen like this:
The next steps are explained in Configuring WordPress, WPFolio and required plugins. Installing software will be finished soon, in one or 2 more steps, and then you will be creating your site and adding images and other content which will be more fun.
Hi Daniel-
For some reason, when I type in chrissiecarlson.com (my domain name), i get an error saying that I haven’t uploaded FTP correctly. If I type in chrissiecarlson.com/wordpress it works perfectly fine. How do I change it so that it will work with just chrissiecarlson.com?
Thanks,
Chrissie
WordPress has clear instructions on how to do this. As they explain:
Go to:
http://codex.wordpress.org/Giving_WordPress_Its_Own_Directory
—
Or you can do it manually where users will be redirected from http://www.example.com to http://www.example.com/wordpress_folder/
You need to add the following to the .htaccess file in the root folder of your remote site. Do not delete what is already in the file. And you must use a text editor, not Word or other word processors. (See my tutorial for an explanation of text editors)
Obviously, you need to replace “name_of_your_site” and “wordpress_folder” with the real name of your site and the folder where WordPress resides.
The WordPress Docs have more information about the .htaccess file here.