Enabling WPFolio
NOTE: You can also take a look at Eyebeam.org’s instructions for WPFolio:
WPFolio Instructions
Go to the admin section of your wordpress website.
the url will be something like:
http://www.yoursite.com/art/wp-admin
http://www.yoursite.com/wp-admin
Fill in your username and password for WordPress. You will see the WordPress "dashboard".
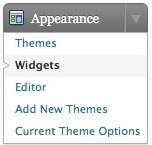
Click "Appearance" in the left hand menu.

In the themes section click Activate beneath the WPFolio screenshot.
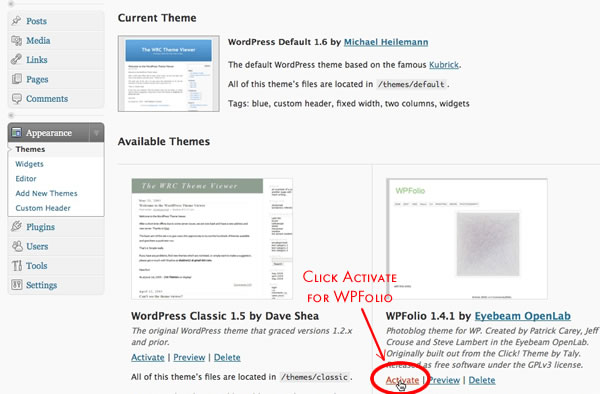
After you have activated WPFolio it will be highlighted as the Current Theme. You may return to the Appearance settings later for further configuration.
Enable Plugins.
Click Plugins on the left hand menu.
You will see a list of plugins. Click "Activate" for Gallery Plus, Lightbox and Contact Form 7 and PHP Markup if you have chosen to install it. You will not need to activate Askimet or Hello Dolly.
WordPress Configuration
General Settings
Click Settings in the left hand menu.

Enter a blog title, usually your name. The tagline is optional. Leave it empty if you wish. Change the timezone to UTC -5.
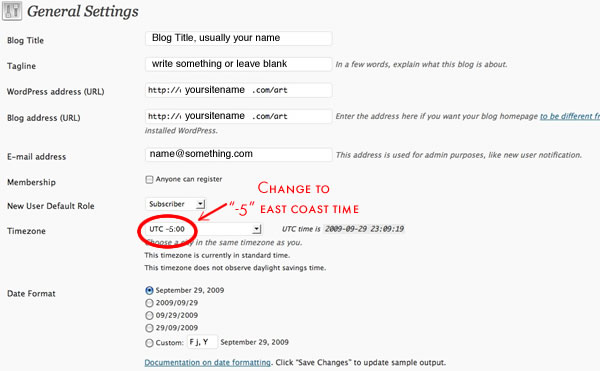
Don’t forget to click "Save Changes"
Writing, Reading, Discussion Settings
We will skip Writing, Reading, Discussion for now.
Media Settings
Click on "Media" in the "Settings" menu.
Change Large Size to 900 width and 600 height. The other settings should remain as the default.
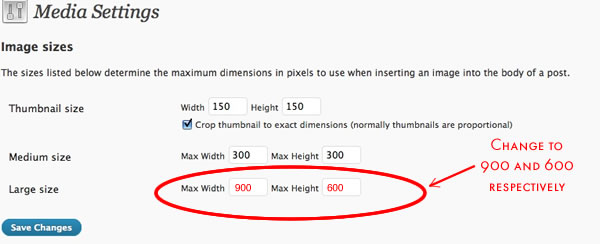
Don’t forget to click "Save Changes"
Permalink Settings
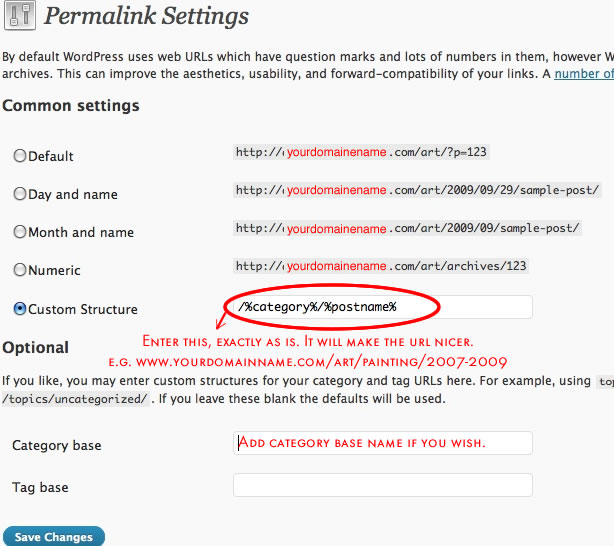
Click Permalink in the Settings menu. Enter the following in "Custom Structure":
/%category%/%postname%
This will make the url more "friendly" and will be in everyday language.
Click "Save Changes".
For more information see WordPress Docs on Permalinks. Technical problems can develop when creating friendly urls. This is probably caused by an .htaccess file that is not writable or does not exist. Read the Wordpess Docs on Permalinks to solve the problem. Most of the information you need will be in the section titled "Using ‘Pretty’ permalinks".
Miscellaneous Settings
Leave the Miscellaneous Setting as is.
Configuring Widgets
Now we will add a couple of widgets to the “navbar” to create an easy-to-update menu. The names of Categories and Pages will be the items in the your navigation. Aside from my instructions you can also read the instructions on the WPFolio Site
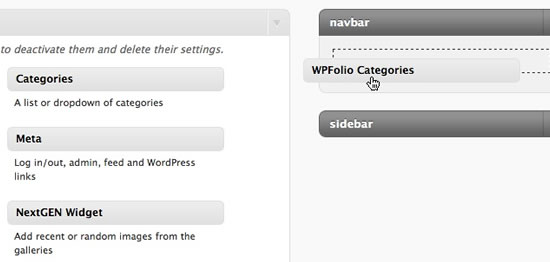
Click "Widgets" in the "Appearance" in the leftside menu.
In "Available Widgets" drag the "WPFolio Categories" banner to the "navbar".
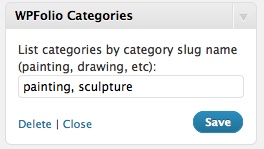
Open WPFolio Categories Widget by clicking the triangle at the top right. To customize the order of the categories fill in the catgory slug names in the order you wish. Be sure to separate them with a comma. If you are unsure of the category slug name go to Posts->Categories to check them. A slug name will be the category name written in all lower case letters with an underscore replacing white space. Don’t forget to click "Save".
Note: A category will not appear on your website until it includes posts.
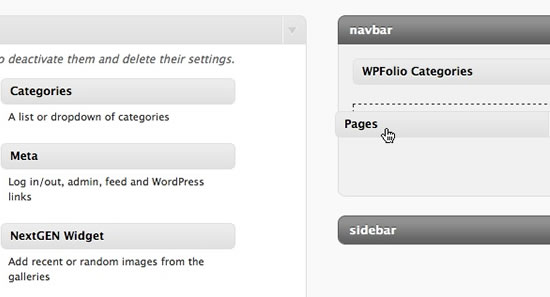
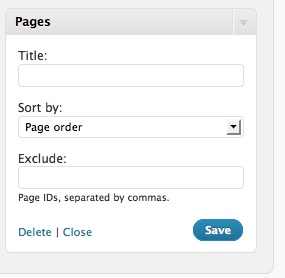
In "Available Widgets" drag the "Pages" banner to the "navbar". I recommend that you place "Pages" beneath the "WPFolio Categories" widget. Pages will then appear after Categories in your site navigation.
Ordering Pages – Pages can be ordered alphabetically by title, by their ID or you can customize their order by choosing "Page order" from the drop down list.
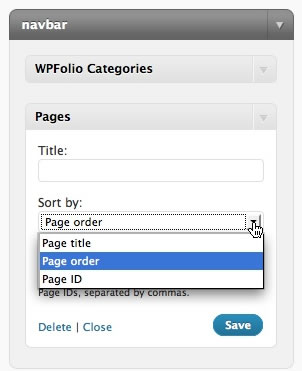
You can also exclude pages by adding their ID number.
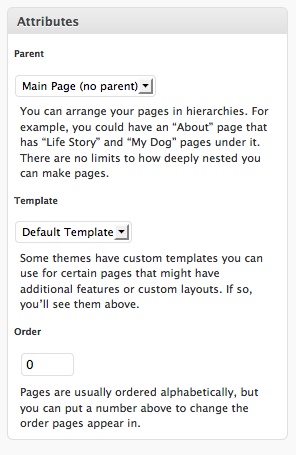
Skip this step if you are not customizing the page order. To customize "Page" order, navigate to Pages->Edit Pages and click on a Page. Add the order number to "order" in the "Attributes" subpanel. Remember that WordPress, like many digital products, starts with 0 and not with 1. Then "Update" your page.
Note: You may notice some comments regarding ordering categories in the menu. The instructions above should minimize those problems. If you need to customize your menu more than this I suggest you use the Menus Plus+ plugin. Read my tutorial on how to use Menus Plus+ with WPFolio for installation and usage instructions.
Gallery Plus Settings.
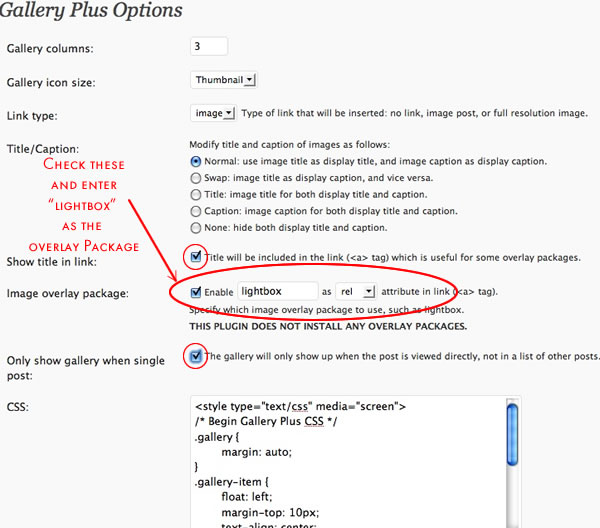
Click Gallery Plus in Settngs menu.
You may wish to change "Gallery Columns" from 3 to 4, depending on how you want the layout of your "galleries".
Check "Show Title in Link"
Check "Image overly package" and add "lightbox" in the text box.
Check "Only show gallery when single post"
Leave the rest as is.
Hello,
I’ve started a good ole fashioned blog with your theme and i love the look.
But I very much want to have the ability for people to be able to scroll to older post pages at the bottom of my main page (and all subsequent pages) and I can’t do that. Can you advise me how to do this or point me in the direction of someone who can? Thanks so much,
Heidi
I started with the WPfolio template. I thought the category’s: calender, art, ect.. that was the nav would be linked to post or pages. How do I do this.
Whenever I’m in dashboard I’m not getting how to put the page or post where I want it in my nav structure.
thanks
rp
Rodger,
The next section
http://www.danielwiener.com/is/artist_website/categories-navigation-menu
explains categories and navigation better.
Categories work more like containers. When you click on a category in the menu you will see a list of posts, which in the WPFolio template will previewed as a thumbnail. For WPFolio, “Posts” are meant to be used for a group of images, while “Pages” are meant for more text based entries. I hope this makes it a little clearer.
If you send me a url of your project I might be able to help more.
I have added some instructions for a Hack for Ordering Categories.
— Daniel
Hello,
I am new to wordpress and am currently installing wpfolio. I tried the hack for ordering catagories. The result is the current state of my site showing this error:
Catchable fatal error: Object of class WP_Error could not be converted to string in /home/usimonfl/public_html/wp-content/themes/wpfolio/functions.php on line 218
So I thought I would start again. I un-installed then reinstalled wpfolio. Started from the beginning and I am still having this problem. Can you help me?
thanks
Simon,
I have not come across this problem so I may not have a quick easy answer.
A few questions:
Did WordPress and WPFolio work before you tried the hack for ordering Categories?
In general I would try to get it to work before changing the code. Once you get WordPress and WPFolio to work then try the hack. Once you are changing the code, my guess is that it is a missing semi-colon, quote, bracket or some other small mistake that computer code does not like.
What version of WordPress?
What plugins do you have installed?
When troubleshooting it can help to turn off all the plugins, see if the problem occurs and then turn on plugins one by one to see if they are causing the problem.
Errors like this are very frustrating but we’ll figure out a solution.
Daniel
Hi
I am have set up my site with a static homepage or frontpage. Just curious if it is possible to have more than one image on there.I am thinking like a triptych l. Have tried, with different alignments, but it just comes out uneven and generally strange looking
Thanks muchly
Lars
Lars,
Sometimes things that seem like they would be easy are difficult. This is one of them. The code for floating images that is created by WordPress is a little funky and not too flexible, so if I were doing this I would make some changes to the CSS. However, this can be a bit complicated unless you have a good understanding of CSS. My recommendation is to create a composite image of your 3 chosen images in your favorite image editor (photoshop, etc.) and then upload that image. I do this frequently, even though it is a compromise. I hope this helps.
Daniel
Hello Daniel,
When I click on thumbnails, lightbox launches a massive un-centered image. I found this hack:
http://nooxnet.com/2009-07-12/lightbox-2-with-auto-resize-in-wordpress/
but it didn’t work for me. Any suggestions? Oh, and I’m using “one button ftp,” which is simple and somewhat annoying to use, but free.
thanks,
sam
Sam,
Thanks for the tip on “one button fly” ftp.
I took a look at Lightbox 2 with auto-resizing. To help you troubleshoot I need more information. If I were troubleshooting this myself I would check to make sure the files are all where they are supposed to be. I would check the page source for the page (in Firefox, it is View->Page Source). Check the settings in WordPress. I also use the Firebug extension for Firefox to debug javascript. If you give me more information I may be able to give more specific suggestions.
–And some more thoughts—
I think the problem is that your images are too big. As with everything digital, images will be rendered on different sized screens with different resolutions, so you have to compromise to fin the optimal image size. Now, I suggest that images be no more than 900 pixels wide and 600 pixels high at 72dpi. This size will fit on an average-sized screen without scrolling but aren’t too small on a big screen. This means that you will need to delete the images you have up on your site now, prepare images with photoshop or another image editor and upload the resized images to the image gallery on your site.
As an alternative you can tell WordPress to resize your images when you upload them. Go to Setting->Media in the WordPress Admin, enter 900 for max width and 600 for max height for large images and save. You will still have to upload your images again for this to take effect.
If you want to use larger images that are resized to the screen size on the fly as they are displayed, this is something more complicated. I am sure that there is a JQuery plugin or hack that will do that, however I am not familiar with one and I expect using it will require some programming knowledge… not just copy and paste. If you find one, though, please let us know.
I used photoshop, and it worked great! thanks again.
I have gone through these steps and when I go to “view post” this error come up…. any idea what I am neglecting?
Meghan,
This was caused by couple of issues. First it was caused by creating pretty urls (when you added /%category%/%postname% to the permalinks settings). Your .htaccess file either was not writable or did not exist. Read the Wordpess Docs on Permalinks to solve the problem. Most of the information you need will be in the section titled "Using ‘Pretty’ permalinks".
The other reason this happened is that the “WordPress address (URL)” was different than your “Blog address (URL)” in Settings->General. Your WordPress Address was http://www.yoursitename.com/art (you had placed your wordpress files in the folder called “art”, as I suggested) but you used the root url (www.yoursitename.com) for you Blog Address. This is a perfectly fine thing to do but you need to configure some files in order for it to work. In the Comment section of Installing WordPress there is an explanation of the problem and links to instructions for solving it.
A 500 server error is often difficult to solve because the error does not give you any information about what is causing it. The solution to the problem is a little more technical than other parts of these tutorials but is solvable nonetheless with a little patience and careful reading of the instructions.
Hi Daniel,
I noticed Simon on Dec 31 came across a problem that caused a Catchable fatal error. I just got that error when using the WPFolio Categories widget. It seemed to be caused by having a space (or a hyphen) in the name of the category. The slug name may be a problem too, but definitely the category name is a problem. Hope this helps.
Good meeting you the other day.
Best,
Dread
Dread,
Nice meeting you, as well.
Yes. I came across this problem with students at RISD. The slug needs to be one word without spaces or underscores or dashes too. It is a bit of a problem. You cannot have categories like “Recent Work”, etc.
Hello Daniel,
Thank you for your tutorial.
I have a question regarding the display of blog posts in my “News” section. For some reason, the post title and date are not shown on top of a post. The image and body text are the only things that are displayed for each post. I double checked the post title on the admin side, where everything seems to be fine,
Is there a place where I need to activate the post title/date for display?
Any advice would greatly help!
I am not sure why this is happening on your site. Do you have the most recent version of WPFolio? It would help if you sent me the url of your site so I could check it out. I might be able to determine the problem more easily.
best,
Daniel
Hello,
I was able to resolve the problem with help from the WP support forum: http://wordpress.org/support/topic/new-title-does-not-appear-with-latest-post?replies=10#post-1709831
I don’t understand why my code was messed up, since I hadn’t modified it. May be because I downloaded the newest version that has not been “officially” published?
Anyway it works now! Thank you for offering your help.
Dear Daniel,
Thank you for your excellent tutorials. I’d have never manage to get this “far” without them!
My questions:
1. how does one remove the autoheader on each page/category?
2. how can I make a link from my welcome page so that when a user clicks on the main image they are taken to the porfolio posts?
Many thanks.
Sonal,
I am not sure what you mean by “autoheader” in question 1. Please explain.
To link to your portfolio page, first copy the link of your portfolio page. In this instance “http://www.sonalnathwani.com/?cat=21”. Then go to the edit page for your front page. Click on the image, then the edit image icon on top of the image. A dialog box will appear. Paste the link into the field for links. Click all the “ok”, “save” and “update” buttons, as appropriate. It is a bit hard to explain without pictures. If you don’t understand I will post some screenshots.
Hello and thanks for all these good tips.
I have a problem which I feel is really basic, but all my searching and reading hasn’t shown me the answer:
In my News category, the posts display as a gallery, in left-to-right columns across the screen. At first, they were just the titles of the posts and that was really boring, so I dressed them up with Featured Images. Which looks better, but what I really want is for the News to be displayed in the blog format–one column which shows the whole post, new posts chronologically placed on top of older ones.
Can you tell me how to change the viewing format of News to a news/blog format instead of what’s currently going on? My site is http://www.mauramcgurk.com.
Thanks!
WPFolio has a few reserved words which tell the template to have a “blog” layout, rather than a “gallery” layout. “News” is one of the reserved words. But I went to your site and clicked on “News” in your navigation menu and was taken to this url:
http://mauramcgurk.com/category/uncategorized
This means that you need to change the category “Uncategorized” to “News”. In the WordPress Dashboard go to Posts->Categories. There you will see a list of categories. Click on “Uncategorized” and change the category name to “News” and change the slug to “news” then click “update” and that should do the trick.
You may have to change how you have made your menu. You will want the “News” in the main menu to go to http://mauramcgurk.com/category/news
If you have a problem with this, write again.
I hope this answers your question.
This genius advice worked–thanks so much! And I appreciate the speedy reply!
Thanks for the tutorials,I would really love to use this theme,but have been going around in circles trying to fix my Blog. I made a page called blog and then I made a category called blog. My slug is calling it Blog-2 and won’t let me change.My blog is not displaying the title or date. I know someone else had this problem,but I don’t have the nerve to try messing with code.I seem to also have a couple extra categories called blog when I go to categories add new, that are listed on the side which I can’t figure out how to get rid of even though I deleted all the categories when I went to post/category. They are still showing up in drop down menus. If I can’t mess with code what’s the best thing to do? Delete theme and start over? I can’t find even how to do this. I am using wp 1.5.2.1. I tried to download 1.6.3 as a zip but I got a lot of individual files that will only upload individually-that didn’t seem right? Sorry, obviously I’m a bit new,but trying to learn-Thanks!
1) In order for a “blog” to be formatted as a blog (as opposed to a gallery) the slug needs to be “blog”, that is just “blog”, not “blog-2” or “blog…anything”. The reason your category is “blog-2” is that you have another category called blog.
2) WordPress differentiates between “Pages” and “Posts”. Entries to your blog must be “Posts” not “Pages”.
3) If you already have a category named “blog” just use that.
4) On the right hand side of the “New Posts” or “Edit Posts” screens there is a list of categories. When you create a post, check the appropriate category.
5) I just went to your site and blog-2 is not a category, it is a “Page”. This is not what you want. You should probably delete it.
6) And you have “10×10 Benefit Art Exhibit” as a category. Are you sure you want that as a category? Shouldn’t that be a “Post”.
7) I also think you have set your permalinks incorrectly on the setting page. Go to Setting->Permalink. In “Custom Structure” write /%category%/%postname% – I think you left the slashes out. It should be slash-percentage-category-percentage-slash-percentage-postname-percentage. Got it. I know it does not make sense until you get used to it.
8) You don’t need to delete. If you wanted to update to 1.6.3 you will need to be able to FTP the files to your site. I have a feeling you are not ready for that.
9) I think you are fairly confused. I think you should read my tutorial more carefully. And read Steve’s tutorial carefully. And read some of the beginning “docs” on WordPress.org http://codex.wordpress.org/WordPress_Lessons. Please don’t take this the wrong way. For the most part WordPress is fairly easy but there are few things that take some learning and some of the instructions are very specific and need to be followed step-by-step, like the relation between categories and posts. Steve’s into to categories is quite good. http://wpfolio.visitsteve.com/wiki/instructions/categories-tags-taxonomies and his instructions on creating a post is also helpful – http://wpfolio.visitsteve.com/wiki/instructions/adding-content
I hope this helps.
Thank-you for your quick and thorough reply. I guess I jumped in too soon. I have read a fair amount,but maybe too many and not well enough.I was hoping to start Blogging before I finished my entire site. One source told me,” to start a Blog, create new page and title Blog”I then also created a category named “Blog” by reading the WPFolio source. I’ve deleted my blog page now,but since I’ve made my first page static, don’t I need a page to set the posts to, preferably called Blog. Right now it’s set to the About page. I was waiting for the latest version 1.6.3 before I tackle menus.
In my attempt to fix things, I did create too many unnecessary categories to which I can not entirely get rid of. I’ve deleted them from the list you see when you hit categories ,but they are still showing up in the drop-down parent menu and when I go to Posts-add new, they are still listed? I deleted my one post with categories checked I didn’t want, so I could start fresh but that didn’t help. Thus when I go to create a new category called Blog I’m still getting blog-2 as a slug. I can’t find how else to get rid of these?
I had the slashes but did have a small typo in permalinks-thanks for catching that.
You can delete categories.
Go to Settings-Writing and change the default category to a category you want to keep.
http://www.danielwiener.com/is/wp-admin/options-writing.php
You do this because you cannot delete the default category.
Then go to Posts->Categories
http://www.danielwiener.com/is/wp-admin/edit-tags.php?taxonomy=category
In the list of categories on the right, place your cursor over the category and a list of links will appear, including a “delete” link. Click it to delete the category. Once you have deleted the unwanted categories, it should be easier to do what you want to do.
Thanks for answering again, but the strange part is none of my categories except uncategorized are showing up there as I did go in and delete all the categories from there already, but they are still showing up when I scroll down under “parent” and as options to check when I add a post? So some how they haven’t really gone away? I think I really did a number on my sight and would like to start again and go through your tutorials very carefully, but can’t seem to erase my mistakes completely. For instance when I hit blog I’m getting something like janetbroxon.com/category/blog/blog-blog/blog/blog-blog. Should I just reinstall the theme and start fresh? Although, I’m not clearly seeing how to do that? Thanks, and sorry for all these questions, if I ever figure this out I will definitely donate to you guys.
Hi- just wanted to up-date you. I found someone who designs with WP and had him go to my host’s control panels and look at my files and we did find strange duplications we couldn’t get rid of and corruptions so I’m starting from scratch with 1.6.3. If you have a sec, what’s the best way to go step by step through this, will most of your tutorials also work for 1.6.3? I noticed Steve’s website also has some instruction for 1.6.3. Just want to get off to the right start and not mess this one up.-Thanks
I am doing this site julesbylesliejane.com with wpfolio.
My question is how can I change the order of the “more” on the bottom of the thumbnail galleries? In otherwords – the “more” with the arrow on the left goes FORWARD to the next set of thumbnails and on the right side of the page the “more” goes BACKWARDS. I need to change that so that FORWARDS would be on the right and BACK would be on the left. Can you help?